Showing posts with label hair. Show all posts

Monday, 8 July 2013

Step by Step Half Up Beehive With Loop Detail

Front view of beehive with loop detailBack view of beehive with loop detail

Today I thought I'd run through how I achieve this half up, beehive hairstyle, with the loop detail at the back. It's a really cute look and is really simple to do. It usually takes me about 5 minutes.

All you need is a comb, some hairspray, some hair slides and a hand mirror. 

Tools needed for beehive with loop detail


Step one: Back-comb the hair
This is the first and vital step to getting the volume for the beehive and especially important for me, as I have quite fine hair. So I take the top area of my hair and separate into sections and back-comb the roots as much or as little as you'd like, depending on the type of hair you have and the amount of volume you want in your beehive. Then, spray the roots with hairspray and comb gently over the top, to smooth out any fuzzy, visible edges! Add a little spray to the top of your hair, to hold in place.

Step two: Divide hair & start to create beehive shape
Take hair from both sides of your head, at the same time and pull towards the back of your head, whilst taking the hair from the sides and back with your fingers, at the same time. Like you would if you were putting your hair into a 'half up, half down' do. Pull it back to a slightly lower point than you want the loop to sit.

Step three: Create beehive
Now you are holding the hair at the back of your head, push it upwards to a place where you are a) happy with the amount of beehive (you can go crazy here, or just have a gentle beehive like I have) and b) are happy with the level at which you will pin the hair and create the loop detail.

Step four: Pin the hair
Using your hair slides, pin each side of the hair, at one point on the back of the head. Make sure the hair is secure and you are happy with the appearance of the beehive. Spray.

Back view of beehive with hair slides in place

Step five: Create the loop detail
Now you can start to create the loop. Start by taking the section of hair that has been pinned back, making sure to remove any straggling hairs from the rest of you head that have caught up in the hairspray. Loop the hair in your fingers and divide the hair into two sections, taking one to one side and the other to the other side, whilst pulling it up over the pins already in place (so that the loop covers this). This is where you need eyes in the back of you head, as you need to feel the loop and adjust the size as needed. If you can hold the loop and sides in one hand, you might be able to manage to have a sneaky look in the mirror, which will help this stage.

Step six: Pin the loop detail
Once you are happy with how the loop looks, take a couple of hair slides and pin it through the loop, from outside, towards the centre. Do this on both sides. Spray.

And you're done! Pretty easy! It gets easier with practice too and you can get more and more adventurous with the size as well!
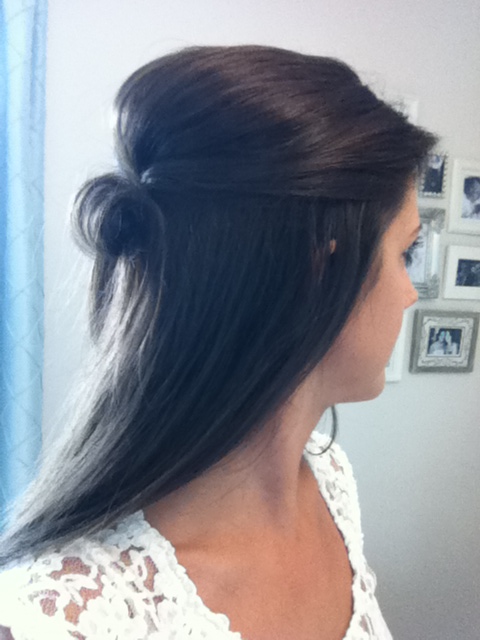
Side of beehive with loop detailSide of beehive with loop detail

Back view of beehive with loop detail

What do you think? Is this something you'll try?

Check out my bun and side plait step by step too!

Sunday, 9 June 2013

Festival Outfit from New Look

Festival Look 2013 collage

It's festival season and with the weather showing some hope for summer, I thought I'd put together a summer festival look, all for under £105, from New Look

Tousled Hair
The perfect festival hairstyle is one that doesn't need much maintenance and this look is perfect. The tousled waves are easy to maintain with a 'scrunch and go'. They look relaxed and effortless, letting you enjoy yourself without worrying about where to plug in your straighteners!

Tousled Festival Hair

Light Blue Dress
This Light Blue Floral Crochet Neck Sleeveless Dress, for just £19.99, comes in brown and navy as well as blue and is really girlie and flirting. The high neck is really cute and I love the crochet detail.
New Look Light Blue Floral Crochet Neck Sleeveless Dress, £19.99

Suede Fringe Bag
You always need somewhere to put you phone, purse, sunglasses, sun cream and rechargeable torch (!) and this cute Tan Suede Fringe Back Pack, £29.99, is perfect for holding all your necessaries.

With this bag being a back pack too, your hands are free! Perfect! The fringe detail is really lovely and adds a sense of festival chic!

New Look Tan Suede Fringe Back Pack, £29.99

Ethnic Necklace
This White and Gold Ethnic Bead Statement Necklace, £14.99,  would look gorgeous layered over the crochet neckline of the light blue dress. Statement necklaces are so on trend right now and with this piece, a statement would definitely be made. 

New Look White and Gold Ethnic Statement Necklace, £14.99
Leather Boots
These are adorable! Sensible footwear is a must on a festival field and these Tan Leather Glitter Back Ankle Boots, just £25 (reduced from £54.99!), are perfectly girlie, to team up with the light blue dress. 

I love the fact that these boots are plain to the first glance and incredibly sparkly and a feminine on the back. Love these! You'll be the envy of your friends when you have dry, comfortable feet with added sparkle!

New Look Tan Leather Glitter Back Ankle Boots, £25

Sunglasses
These Nude Diamanté Square Frame Sunglasses, £7.99, are a must for the festival season, especially if the sun stays out! You want to be able to see you favourite bands without squinting and looking pretty cool at the same time. So, what better way than with these cute sunnies!

New Look Nude Diamanté Square Frame Sunglasses, £7.99

Cuff Bracelet
I love cuffs and stack bracelets and this Gold and Orange Zig Zag Stretch Cuff, £6.99, is perfect for this festival look. The colour beads tie in with the back pack and boots and finishes off the outfit, with a touch of glam. Perfect!

New Look Gold and Orange Zig Zag Stretch Cuff, £6.99

Let me know if you've bought any of these and whether you're wearing them to a festival this year!

Thursday, 18 April 2013

Step by Step bun with side plait

Bun and side plait hairstyle

I was asked a few times today about how I do my hair in this bun. So, I thought I'd post a quick 'step by step' on how its achieved. It's dead easy. I especially love this look on a day when I don't have enough time to wash and blow dry my hair. Lets face it, not many of us have time to do that everyday! It can work with straight or curly hair, thick or thin. The one restriction is length really. It needs to be past the shoulders really in order to have enough hair to tuck into the messy bun. (If you noticed my cute collar necklace in this photo, check out my previous post for more info and photos).

Hair tools used

All you need is a comb, a hair doughnut, some hairspray, a hair slide, a hair band and lots of securing pins. It usually takes me about 5 minutes.

Step one: Prep the hair
Firstly back comb the roots a little and give your hair a slight hairspray, whilst hanging your head upside down. I find that this helps to give the hair a little extra volume because my hair is quite fine. It also makes my hair less slippery and holds the style for longer. If you don't want to back comb your roots, a little spray onto the roots and then blow drying the roots until the spray has dried, has a very similar result. Obviously if you are blessed with thicker hair anyway, you can skip this stage!

Step two: Plait the fringe
Part the front of you hair on the side and take the fringe section across to one side or the other, which ever you're most comfortable with. Then, French plait the fringe, taking in a couple strands from each side each time and working the plait toward the back of you head. Pin in place with a hair slide. It doesn't matter what size or colour, as this will be removed once the bun is secure.

Step three: Tie the ponytail
You then need to put your hair into a high ponytail, being sure to take the end of the plait securely into the ponytail and making sure all other hair is firmly back and not caught underneath the hair slide. If there is hair tangled underneath and the hair won't sit flat, I sometimes take the slide out and hold the plait into my ponytail, whilst I add the band. I can do this as my fringe is quite long but it would be easier to remove the slide, re position the hair underneath and secure in place again, if you fringe is shorter.

Step four: Add hair doughnut
Once your ponytail is in place, you can add the hair doughnut over the top of the ponytail, pulling the ponytail through the middle. You can get various different size and colour doughnuts. Find the best one for the look you want and for your hair colour. The closest it is to you hair colour the better, just in case a bit peeks through your hair!

Step five: Create the bun
I find it's good to give the ponytail a slight spray first and then lay it over the doughnut, spreading the hair to cover it all. Once you have covered the bun, start pushing the hair around and under the doughnut. Continue doing this until all the hair is hidden. You don't need to make this tidy. I think the messier the better sometimes! 

Bun from back

Step six: Secure the bun
Once you are happy with the look of your bun, you can start adding the securing pins around the bottom edges, closest to your head, to hold it in place. It's best to get the pins that you can push together before pushing into the bun, as when they are in place, they open to add extra grip. I use BaByliss 'No Ouch Pins'. They come in two thickness's and you get 50 in a pack. I think I got them in Boots. I usually find about 5/6 pins is enough, but use as many as you need. Once all the pins are in place, you can remove the hair slide holding your plait.

Hair slide openClosed hair pin

Step seven: Spray to hold
Once you are happy with you bun, give it a little spray to hold in place. And that's it! Once you've got the hang of it, there's so many variations you can try.

Top tip: I always take a few extra securing pins out with me, in case a couple strands of hair escape during the day/night. It's always good to be prepared!

Wednesday, 17 April 2013

Burgundy hair, green eyes, beaded collar & bowler

Hair, make up, collar and bowler hat

Burgundy hair & fringe
I love this first image as it combines two of my obsessions at the moment. Firstly, whether I should colour my hair in this gorgeous burgundy/plum shade and secondly, whether I should have my fringe cut back in. Both dilemmas for me, as I change my mind about my hair every five minutes; like most of us!

Firstly, this shade of hair colour is simply gorgeous and I'm just a trip to the hairdressers away from doing it! It's so rich and eye-catching, without being too bright. I've mentioned it to various friends before and they've all said I should just go for it. If I were to go for it, I'd be likely to head to a salon, however if I were to colour it at home, this shade looks a little like Loreal Casting Creme, Plum 316 or Garnier Nutrisse, Burgundy 4.26, or maybe a combination of the two! If anyone has any other suggestions, I'd love to hear.

Secondly, lets talk fringes! I love fringes. They give a hair cut certain style, when cut well. When I had a fringe cut in previously and loved it for a couple of years. I wore the rest of my hair long to start and then had a layered bob afterwards. I really fancy having it cut again, but will I regret it.

This image makes me want to do both!

Green eye make-up
Playing with make-up looks that are a little braver than the brown or grey smokies, is something I would really love to do on a more regular basis. I love playing with colours but am often not brave enough to wear them as much as I should. This image is really beautiful. The use of green eye shadow and cream in the inner corners, really opens the eye. 

Peacock Tail eye-shadow from Collection Swimming eye-shadow from MAC

Collection Cosmetics Work the Colour Solo Eye Shadow in Peacock Tail, would be really great for this look. Slightly on the blue end of the green scale, this would look stunning. Alternatively, MAC's high pigmented eye shadow, in Swimming, which is more green than Peacock Tail, would be a show stopper too. I'd even maybe fancy getting both shades and mixing my own. Sometimes the best colours are custom.

Beaded collars
My love for Collars has been a long standing one. I've got various tops and dresses with peter pan or beaded collars. I've also got a few necklace collars, but nothing quite like this one. I've just bought this from New Look, the Gold Woven Pastel Bead Collar Necklace
New Look collar necklace

At just £5.99 it's a snip and if you shop at New Look at the moment, a lot of their jewellery is buy one get one free, so even better!
Collar necklace images, from New Look
As you can see, the collar looks really cute on. It's got three shades of gorgeous multi sided beads on a gold chain, with a really good length extender chain, so you can adjust your look. I love it already and have so many outfits I want to try it on with. With the offer on at New Look, I might even get a couple more designs, as they have quite a few.

Bowler hats
Hats, hats, hats. And bowler type hats to be precise. I used to have a hat just like in this image when I was about 14. I thought I was the 'bees knees' and wore it with little dresses and black knee high socks! I'll have to see if I can find some photos! I loved it so much and it's great that this style of hat have come back into fashion. I really want to get one (if I can't find my old one) and have found a couple really nice and affordable ones on the high street.

This wool Rolled Bowler Hat, £24 from Urban Outfitters, has ribbon detail on the rolled brim and would be sure to add style to an outfit.

Wool rolled bowler hat from Urban Outfitters

And finally, this Roll Brim Felt Boater Hat is really cute. It's from ASOS. This one is just £18 and appears to actually have a slightly smaller rim. Crafted in pure wool, this one features a domed crown  and turn up brim, in a smooth, felt finish.

Boating wool hat from ASOS

I hope you enjoyed my Looks 2 B Loved this week. If you've tried out any of these looks, I'd love to know! Especially if you know what hair colour this is! :)

Check out my previous Looks 2 B Loved post for more inspiration. 

Related Posts Plugin for WordPress, Blogger...