Wednesday 24 July 2013

Mint Green Quilted Bag

Whilst in Portugal recently, it would have been rude not to do a little shopping wouldn't it?! 

On one particular trip (and there were a few!), I was spoilt for choice with bags, purses and clutches and found it really hard to pick just one; which I amazingly did.

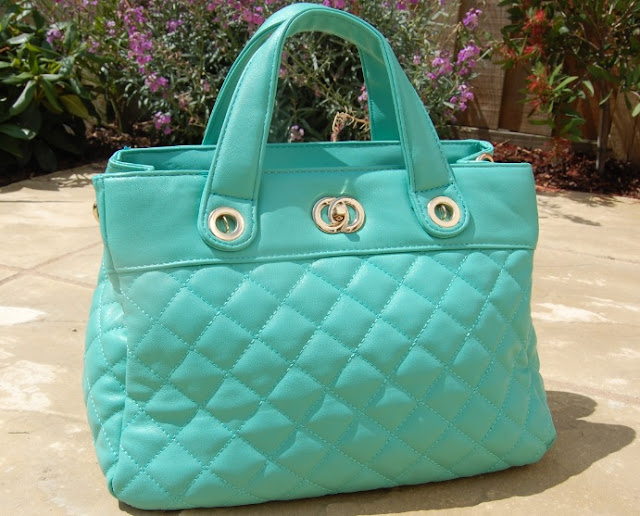
I went for this gorgeous Mint Green Quilted Bag.

Mint Green Quilted Bag

Yes, admittedly it isn't leather (what handbags are these days) but I just thought it was too cute to leave behind. The colour is something I didn't have before either, so it really caught my eye.

I really love the gold buckle fastening detail on the front and the quilted look stitching, which is very fashionable at the moment. The handles are a really nice thickness to hold too, not like some bowler bags, which are round and sometimes a little tricky to keep a hold of.

Another cute thing about this bag is there are three ways to use it. The first is as shown above, by using the short handles.

The second is by attaching the supplied straps to the front and back gold loops to create slightly longer straps.

Mint Green Quilted Bag small straps

The third way is by removing each of the shorter straps, attaching them to each other and to the little loops on each end of the bag, creating a long enough strap to put over your shoulder, or cross body.

Mint Green Quilted Bag long strap

The only slight down side with this option is that the hooks would sit directly on the top of your shoulder, which could be a pain if you're not wearing a lot on your shoulders. Still a really cute idea though.

To be honest, I'll probably hold it mainly, but it's really nice to have options. And when the straps are completely off the bag, the hoops front and back just look like design details and not purely for function, so it works well.

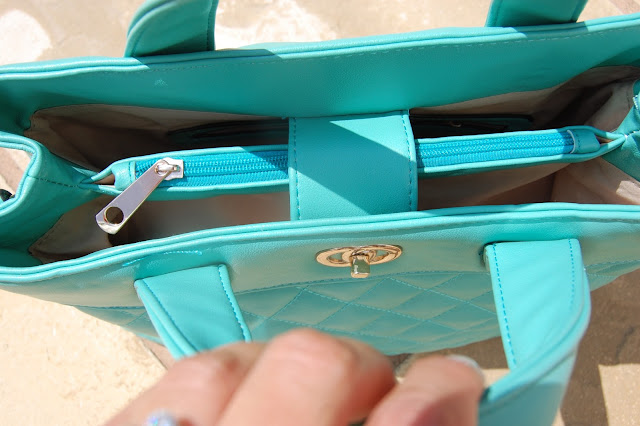
The inside of the bag is really spacious with lots of pockets, zipped compartments and spaces for your phone and lippy.

Mint Green Quilted Bag long strap


Mint Green Quilted Bag inside


The lining inside is really light as well, which is great for finding things. I do hate it when a bag has a dark lining and it's like a Tardis; hiding the one item you want each time!

I really love this bag and for just 15 Euros, I think it's exceptional value.

Have you recently purchased a bargain bag? Let me know!

Monday 22 July 2013

Primark Neon Spike Necklace

On one of my more recent Primark visits, I picked up this gorgeous Neon Spike NecklaceI really love neon at the moment and have previously posted about other neon necklacesI think this particular one was only a couple of pounds, which is great value for the amount of necklace you get!

Primark Neon Spike Necklace


Primark Neon Spike Necklace
As you can see, there is a coloured cord running through the chain detail, with three different length gold coloured spikes coming off the chain. There is a really good extender chain on the necklace too, so you can vary the length at which you wear it.

I really love this necklace and think it looks stunning on sun kissed skin – it really shows off the neon at its best!

Primark Neon Spike Necklace


Primark Neon Spike Necklace

My one small niggle with this necklace is that it has a tendency to turn on itself, making the coloured cord not always sit perfectly flat and the spikes overlap each other a little on the outer edges. This is just the way these kind of necklaces are designed and due to the weight and curve that they sit on the skin, so not a lot you can do about it. I love it all the same and just have to occasionally adjust it. No biggy!

Have you bought any cute Primark necklaces recently? I’d love to hear from you.

Saturday 20 July 2013

L'Oreal Acid Watermelon Polish Fade

You might remember that just before my holiday, I posted about the awesome Acid Watermelon nail polish from the L’Oreal Color Riche range.

L'Oreal Acid Watermelon

L'Oreal Acid Watermelon

The colour is absolutely stunning and so vibrant that I couldn't wait to show off my neon toes in sunny Portugal! 

By day two of my holiday my toes had admittedly already seen quite a bit of sun and chlorine but I didn't expect the polish to fade quite as much as it did. I’d noticed that my toes had gone from ‘neon pink’ to ‘baby pink’ before my eyes, but when I repainted one foot, I realised the extent of the fade and was shocked!

Faded L'Oreal Acid Watermelon


It’s not a problem to paint your toes on holiday, after all, the polish dries in seconds and sometimes you might just want to paint them a different colour.

I would however strongly recommend that if you want to wear this particular shade from the L’Oreal range for the duration of your holiday, that you make sure to pack the bottle in your case! You’ll need it. I reapplied twice in the first week!


Friday 19 July 2013

Portugal Holiday Snaps

I’ve not really posted something of this nature before, but I just really wanted to share some snaps from our holiday in Portugal.

We had such a wonderful time, staying in Guia, a sleepy little village just outside Albufeira on the Algarve. We hired a villa for two weeks, with lovely gardens and private pool. It was perfect.

Sunny days spent lounging by the pool, playing on the beach and eating lots of yummy food – it’s what holidays are all about!

Fishing boats, Woodpecker door knocker, Beautiful flowers in villa garden

Enjoying the beach, Vilamoura Marina, Evening drinks & PoolsideView from the pool, Enjoying the evening sun, Lightened hair

Me & my girl, New Look Bikini, Pool
I also encountered a Sephora store in the local shopping mall, which was really exciting. I bought a collection of bits; so watch out for my post on them soon!

Sunday 14 July 2013

Barry M Nail Art Pen Review

I've seen people using nail art pens for a while and wanted to get one of my own. I thought, as a novice, that I would try one of the Barry M Nail Art Pens, in White, to start off with.  

There are currently four colours in this range; White, Black, Silver and Pink. I was tempted to get all four to be honest, but bought just the white, to see how I get on with it. I got this one from Superdrug for just £4.99. 

Barry M Nail Art Pen - White


Barry M Nail Art Pen - White


As you can see, the nib of the pen is quite fine, which will be great for those thin lines and detail. You need to shake the bottle and then press the nib down a number of times to start the liquid flowing. From there, with it's easy to grip bottle, it's pretty easy to use.

I've only so far ventured into testing that the pen works. I drew a heart on my ring finger first and was really pleased with how easy it was to do. I can't wait to try more designs now!

Barry M Nail Art Pen - White

What do you think of these pens? Have you used one or used others that you think are better? Let me know!

Monday 8 July 2013

Step by Step Half Up Beehive With Loop Detail

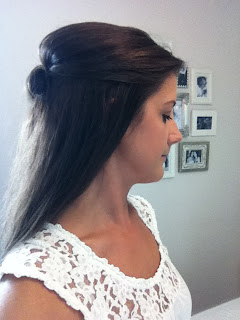
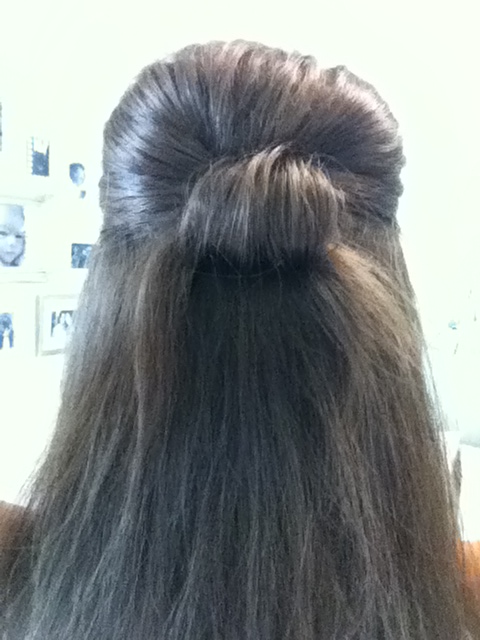
Front view of beehive with loop detailBack view of beehive with loop detail

Today I thought I'd run through how I achieve this half up, beehive hairstyle, with the loop detail at the back. It's a really cute look and is really simple to do. It usually takes me about 5 minutes.

All you need is a comb, some hairspray, some hair slides and a hand mirror. 

Tools needed for beehive with loop detail


Step one: Back-comb the hair
This is the first and vital step to getting the volume for the beehive and especially important for me, as I have quite fine hair. So I take the top area of my hair and separate into sections and back-comb the roots as much or as little as you'd like, depending on the type of hair you have and the amount of volume you want in your beehive. Then, spray the roots with hairspray and comb gently over the top, to smooth out any fuzzy, visible edges! Add a little spray to the top of your hair, to hold in place.

Step two: Divide hair & start to create beehive shape
Take hair from both sides of your head, at the same time and pull towards the back of your head, whilst taking the hair from the sides and back with your fingers, at the same time. Like you would if you were putting your hair into a 'half up, half down' do. Pull it back to a slightly lower point than you want the loop to sit.

Step three: Create beehive
Now you are holding the hair at the back of your head, push it upwards to a place where you are a) happy with the amount of beehive (you can go crazy here, or just have a gentle beehive like I have) and b) are happy with the level at which you will pin the hair and create the loop detail.

Step four: Pin the hair
Using your hair slides, pin each side of the hair, at one point on the back of the head. Make sure the hair is secure and you are happy with the appearance of the beehive. Spray.

Back view of beehive with hair slides in place

Step five: Create the loop detail
Now you can start to create the loop. Start by taking the section of hair that has been pinned back, making sure to remove any straggling hairs from the rest of you head that have caught up in the hairspray. Loop the hair in your fingers and divide the hair into two sections, taking one to one side and the other to the other side, whilst pulling it up over the pins already in place (so that the loop covers this). This is where you need eyes in the back of you head, as you need to feel the loop and adjust the size as needed. If you can hold the loop and sides in one hand, you might be able to manage to have a sneaky look in the mirror, which will help this stage.

Step six: Pin the loop detail
Once you are happy with how the loop looks, take a couple of hair slides and pin it through the loop, from outside, towards the centre. Do this on both sides. Spray.

And you're done! Pretty easy! It gets easier with practice too and you can get more and more adventurous with the size as well!

Side of beehive with loop detailSide of beehive with loop detail

Back view of beehive with loop detail

What do you think? Is this something you'll try?

Check out my bun and side plait step by step too!

Wednesday 3 July 2013

July Wish List

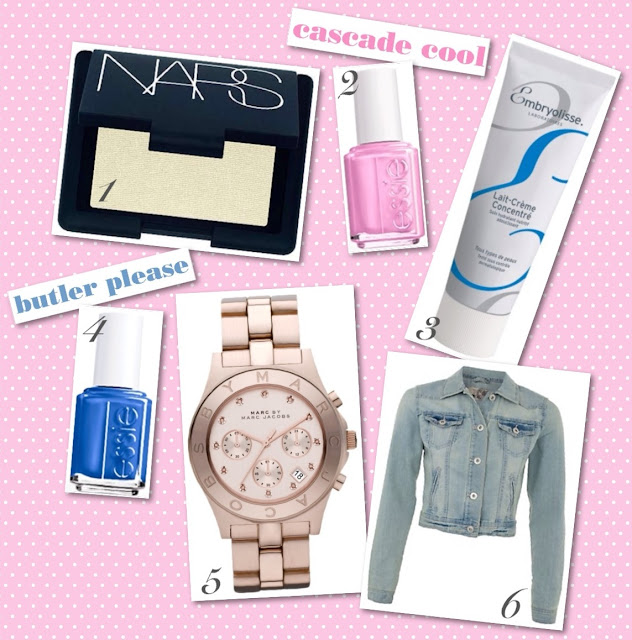
July Wish List Collage


My wish list this month has been building since early June! There are more items than this this month but I thought I'd focus on these, which are my musts for July.

1. NARS Highlighting Powder, Albatross 
Since buying my MUA Shimmer Highlight, which I love, I've been researching to find another highlighting powder that isn't quite as shimmery, that can be worn on a daily basis. I've been recommended the NARS Highlighting Powder in Albatross by Daniella Beauty Junkie and thought it was definitely worth a try. You could buy this from a NARS counter - but unfortunately we don't have one of those in Cornwall, so online it is! I've found it at John Lewis for £21.50.

NARS Highlighting Powder, Albatross

2. Essie Nail Polish, Cascade Cool
I don't yet own any Essie polishes (chock, horror!) and would really like to get my hands on a couple this month. The first is this sweet dusky pink, Cascade Cool. This is such a pretty colour and could well become a staple for me. I've had a look around online and there are some really great offers on eBay at the moment on Essie nail polishes, with some at just £3.99. Bargain!

Essie nail polish, Cascade Cool
3. Embryolisse Lait Creme Concentre
This is something I've heard a lot about over the last few months and has apparently been a staple in most makeup artists kit for years - um, where have I been?! I discovered this again on Daniella's blog. This is a perfect base to makeup, as well as being a smooth, delicate cream that nourishes areas of dryness and protects your skin from environmental aggressors. To me, it sounds like the perfect addition to anyone's skincare and makeup routine. You can get this from Cult Beauty, £18.50.
Embryolisse Lair Creme Concentre
4. Essie Nail Polish, Butler Please
My second Essie nail polish wish this month is Butler Please, this gorgeous bright blue lacquer. I've never worn a blue nail polish of this bright shade before, so really looking forward to trying it. Again this one can be found on eBay for just £3.99.

Essie nail polish, Butler Please
5. Marc by Marc Jacobs Watch, model no: MBM 3102
I am obsessed. These watches are simply gorgeous and for about three months now I have been obsessing about when I will be able to get my hands on one. So maybe this month ? Maybe. Ladies Marc Jacobs watches are available in various designs and colours, but my favourite is this one, which is rose gold plated, with chronograph, rose dot hour markers and the Marc Jacobs engraved around the face. Available from John Lewis at £259, I think I might have to save a little. Be worth it thought with this beautiful gem on my arm!

Ladies Marc Jacobs Watch

6. New Look, Light Blue Washed Effect Denim Jacket
I actually had a cropped denim jacket a number of years ago and took it to a charity shop a little while back. What?! Stupid me because now I want a new one! This one from New Look is really cute and at £17.99 is great value. Perfect to team with a maxi dress and sandals this summer.

New Look Denim Jacket

Are any of these wishes on your list too? Would love to hear from you! 

Related Posts Plugin for WordPress, Blogger...